
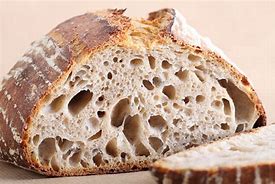
Hey there, fellow bakers! Today, we’re diving into the wonderful world of sourdough bread, that delightful blend of chewiness and tang that has everyone’s taste buds doing the happy dance.
Whether you’re a seasoned baker or a curious kitchen explorer, this guide is packed with the best tips and tricks to elevate your sourdough game to new heights.
Understanding Sourdough
Before we roll up our sleeves and get flour on our hands, let’s chat about the magic behind sourdough. It’s more than just flour, water, and a bit of patience. Sourdough is a living, breathing ecosystem of wild yeast and friendly bacteria, working together to create those airy bubbles and that unmistakable flavor.
Pro Tip 1: Start with Quality Ingredients
Imagine trying to build a sandcastle with wet sand. It just doesn’t work. Same goes for sourdough. Quality matters. Use the best flour you can get your hands on, and don’t skimp on the water. Filtered or spring water is your sourdough’s best friend.
The Sourdough Starter

Now, let’s talk about the heart and soul of sourdough; the starter. It’s like a pet that demands a bit of attention but gives it back in the form of delicious bread. Creating and maintaining a robust starter is key to achieving that perfect rise and flavor.
Pro Tip 2: Feed Your Starter Like It’s a VIP Guest
Think of your starter as a high-maintenance friend. It needs regular feeding and warmth. Keep it at room temperature, and when you see those little bubbles, it’s a sign your wild yeast is doing a happy dance. Feed it a mixture of equal parts flour and water to keep the magic alive.
Mixing the Dough
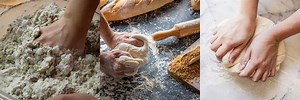
Alright, let’s get our hands dirty, literally. Mixing the dough is where the alchemy begins. You’ve got your bubbly starter, and now it’s time to turn it into a doughy masterpiece.
Pro Tip 3: Embrace the Autolyse Method
Ever heard of autolyse? It’s like a spa day for your flour. Mix your flour and water and let it sit for 30 minutes before adding the starter and salt. This gives the flour time to fully hydrate, resulting in a better texture and easier handling.
The Art of Folding
Now comes the part where you get to play with your dough. Folding is a gentle technique that strengthens the gluten structure, and it’s the secret to achieving that perfect, airy crumb.
Pro Tip 4: Be Gentle; It’s a Dough, Not a Gym Session
Imagine your dough is a fragile balloon filled with precious air. Treat it with care. Use a gentle touch when folding – no need to Hulk-smash it. Repeat the folding process every 30 minutes for the first few hours of fermentation.
Patience is a Virtue
Okay, we’ve mixed, we’ve folded, and now what? Patience, my friend. Sourdough is a slow dance, not a sprint. Let that dough rest and rise at its own pace.
Pro Tip 5: The Overnight Chill for Extra Flavor
Want to take your sourdough to Flavor Town? After the initial rise, let it chill in the fridge overnight. This not only enhances the flavor but also makes the dough easier to handle. Plus, it fits perfectly into a busy schedule.
Shaping and Scoring

Now comes the moment of truth – shaping your dough. This step is where you give your bread its final form, and a well-executed score adds that professional touch.
Pro Tip 6: Flour Power for the Perfect Shape
Flour is your friend when shaping. Generously flour your hands and work surface to prevent sticking. For scoring, use a sharp blade or a lame to create those beautiful patterns. It’s like giving your bread its own signature tattoo.
Baking Like a Pro
We’re almost there! Preheat that oven, and let the aroma of baking sourdough fill your kitchen.
Pro Tip 7: Steamy Situation for a Crispy Crust
Create a steamy environment in the first few minutes of baking by placing a pan of hot water in the oven. This gives your bread that coveted crispy crust. Don’t forget to slash the dough to allow for controlled expansion.
The Golden Rule: Cooling Down
Congratulations! You’ve just baked a masterpiece! But before you dive in, let it cool. I know the temptation is real, but patience is rewarded with a perfect texture.
Pro Tip 8: Resist the Temptation (or Don’t)
Some say waiting for the bread to cool is a test of willpower. Others say it’s a cruel form of torture. Choose your side, but cooling allows the moisture to redistribute, ensuring a chewy, not gummy, texture.
Troubleshooting Common Issues
Even the best bakers face challenges. Let’s tackle some common sourdough hiccups.
Pro Tip 9: Craving a Sourdough Makeover?
If your bread is consistently too dense, try adjusting the hydration levels. Too sticky? Add a bit more flour. Experiment with small changes until you find your bread’s sweet spot.
Conclusion
And there you have it – a journey from flour and water to a heavenly loaf of sourdough. Remember, each batch is a unique adventure. Embrace the process, learn from each bake, and soon you’ll be the sourdough maestro in your kitchen.
So, what are you waiting for? Get that apron on, dust off your flour, and let the sourdough magic begin. Happy baking!